Cookies
- Cookies allow websites to store a small amount of data on user’s device and that is being sent with every request to the server.
- Can be set on a client or on the server.
- For using cookies in a browser, use this library
- To use cookies on a server, you can use cookie library
- When browser receives a response, it will parse
set-cookieheader and store it in a “cookie jar”.
Most common attributes
path: path for which cookie is valid. If not provided, it defaults to current path. It is used to only send cookies when the user is on that particular path and all subpaths
domain: domain for which the cookie is valid. It defaults to the current one and it matches all sub-domains
expires: a time and date when the cookie should expire. If not set, it will expire when the browser is closed
max-age: a number of seconds until that cookie expires. If not set, it will expire when the browser is closed
secure: if set to true, it will be only sent over HTTPS.
httpOnly: if set, the cookie won’t be accessible to JS
sameSite: when set, it will only send cookies to the server if request originated from the same site.
Cookies use cases
- Auth
- theme
Cookies vs LocalStorage
-
Using
localStoragefor storing user ids or tokens is not a great solution, because they can be accessed by any script or browser plugin -
LocalStorage is not sent with every request to the server, and that means it cannot be part of initial rendering of the page. It will have to load client-side code first, make a request to the server to retrieve required data.
How to use cookies
To get cookies from a header, you have to use request.header.get("cookie")
To set a cookie, you have to serialise it first to have a format key=value as a string, and assign it to set-cookie header in a request. You can setup the cookie so it is only sent with certain requests based on the path. For that use case, you have to set path property and if path is set to /admin, the cookie will be sent to /admin and all subpaths.
Form vs useFetcher
Form
Should be used when significant changes are being made to the user’s context or state
- Requires URL to change
- creating or deleting records
- Navigation to a new page
useFetcher
Doesn’t require context switch for the user
- Doesn’t require url change
- updating/deleting a record from a list
- loading data for popovers or modals
Session storage
Session storage is not sessionStorage but a cookie session that disappear once the tab/browser has been closed.
import { createCookieSessionStorage } from '@remix-run/node'

export const toastSessionStorage = createCookieSessionStorage({
	cookie: {
		name: 'en_toast',
		sameSite: 'lax',
		path: '/',
		httpOnly: true,
		secrets: process.env.SESSION_SECRET.split(','),
		secure: process.env.NODE_ENV === 'production',
	},
})

// Server
const someRequest = request
export const cookie = request.headers.get("cookie")
const const toastCookieSession = toastSessionStorage.get(cookie)
// This sets and automatically unsets once it's used
toastCookieSession.flush("toast", {
	data...
})

return json({ data } as const, { headers: {
		'set-cookie': await toastSessioNStorage.commitSession(authSessionStorage),
	},
})

// Client

const someRequest = request
const cookie = request.headers.get("cookie")
const toastCookieSession = toastSessionStorage.get(cookie)
Auth Session
The basic login flow is
-
Find user
-
Verify password
-
Set userId in
cookieSession -
Get the userId from the
cookieSession -
Load the user by their ID
CSRF attack
CSRF attack is a form of attack that a hacker can perform to be able to make a request without having access to a user id or something similar. Usually, it is performed by using a form that makes a POST request.
Password Management
Rules about passwords:
- Don’t store plain text passwords
- Don’t encrypt your passwords; the key may get lost
- Always hash passwords
- hashing is a one way function that converts a string and returns a fixed-length string
- As a safety measure, don’t store user data and password data in a same table. Create separate ones
For hashing in JS, use bcrypt library
Login
When using login, make sure you don’t leak any password to a client
Timing attack
Timing attack is a way to figure out a secret by measuring how long it takes to perform an operation. If you compare whether or not user exists before you check the password, the hacker will know that the user is correct. If the user list is not public (for example a banking app), you have to take that into consideration.
Accessing data from different routes
In remix, you can access data from different loaders (Similar to Context). You can do it by using useRouteLoaderData.
Logout and Expiration
To logout user, you want to delete the session. By default, this is when the user closes the browser. You can set an expiration date on a cookie to “remember the user”, for a certain amount of time.
The expiration time can be configured one of two ways
expireswhere a Data object represents the time the cookie should expiremaxAgewhere the number represent seconds the cookie should remain valid.
Automatic Logout
To implement an automatic logout, you can create a timer that runs so long as the user is actively using the site, you reset the timer. When it expires, you log the user out. It is a good case for very sensitive apps.
In general, while implementing log out, you have to remember about
- Log out button
- Logout when the user ends up on the main page
- automatic logout when the user browsers through the website
You can listen to mouse movements, location or button clicks to update the timer. When the time’s up, you can show a modal when the user is on the page. However, the user might not be at their computer when the modal shows up, so you want to log them out programatically by using imperative mutation.
const submit = useSubmit()
// submit a form:
submit(someFormElement)

// submit without a form:
submit({ some: 'data' }, { method: 'POST', action: '/some/path' })

// submit with no data:
submit(null, { method: 'POST', action: '/some/path' })
Protecting Routes
Redirect authenticated users
When a user tries to access a route that is public, but they shouldn’t be able to access when they are logged in, then we should check that beforehand and redirect.
In Remix, you can do it by using loaders and actions to prevent doing something that people shoul;dn’t be duing when tehy are authenticated (for example, logging in or signing up).
Redirect unauthenticated users
When the user is not authenticated and that particular page require authentication, you have to check whether they are authenticated or not, and redirect them to a login page if they are not.
In Remix, you can do it simirarily to redirecting authenticated users to a home page, but the other way round.
Redirect unauthorised users
There are pages that the user should not be on, because they are restricted to a particular user, for example the one that is currently signed in.
Before you make a request, you have to make sure that the user is the one that should access this page. You can check whether the user exists in a db and if it doesn’t you can log out, otherwise, return the user id and compare it with the ID that is for this particular user.
Redirect from Login
It is a good UX to redirect the user to the page they initially tried to access. To implement that, you should add a query string when redirecting to a login page or a signup page. Also, you should be able to carry that over to login/signup page when the user jumps between pages.
However, you have to make sure that you check whether or not the redirectTo property is not going to be abused by a hacker and it will redirect the user to some random page instead (Someone can change it and copy the link, send it to someone else). You can just check whether redirect starts with / and does not start with https or http.
In remix you can redirect the user using a remix utility called safeRedirect.
export async function loader({ request }: LoaderArgs) {
	let { searchParams } = new URL(request.url)
	let redirectTo = searchParams.get('redirectTo')
	return redirect(safeRedirect(redirectTo, '/home'))
}
Remix implementation
-
Create a form with a hidden input that accepts redirectTo on Login
-
Read search params from the URL and pass it on to a form
-
pass the redirectUrl to a link that redirects to signup/login page and only when redirect is actually there. Make sure you use
encodeURIComponentto encode the URI to replace characters to make sure the represent the UTF-8 encoding. -
on submit, read this and pass it on to
redirectfunction. Don’t forget to usesafeRedirect.
How to construct a new URL
To construct a new URL, you can use new URL that creates a URL object
Role Based Access (RBAC)
RBAC is a way of providing access to certain actions that the user can do. However, instead of attaching a permission to a particular user, they are attached to a particular role. The role can be an Admin, Super Admin, User and those can be attached to more than one permission and more than one user Many-to-many relationship.
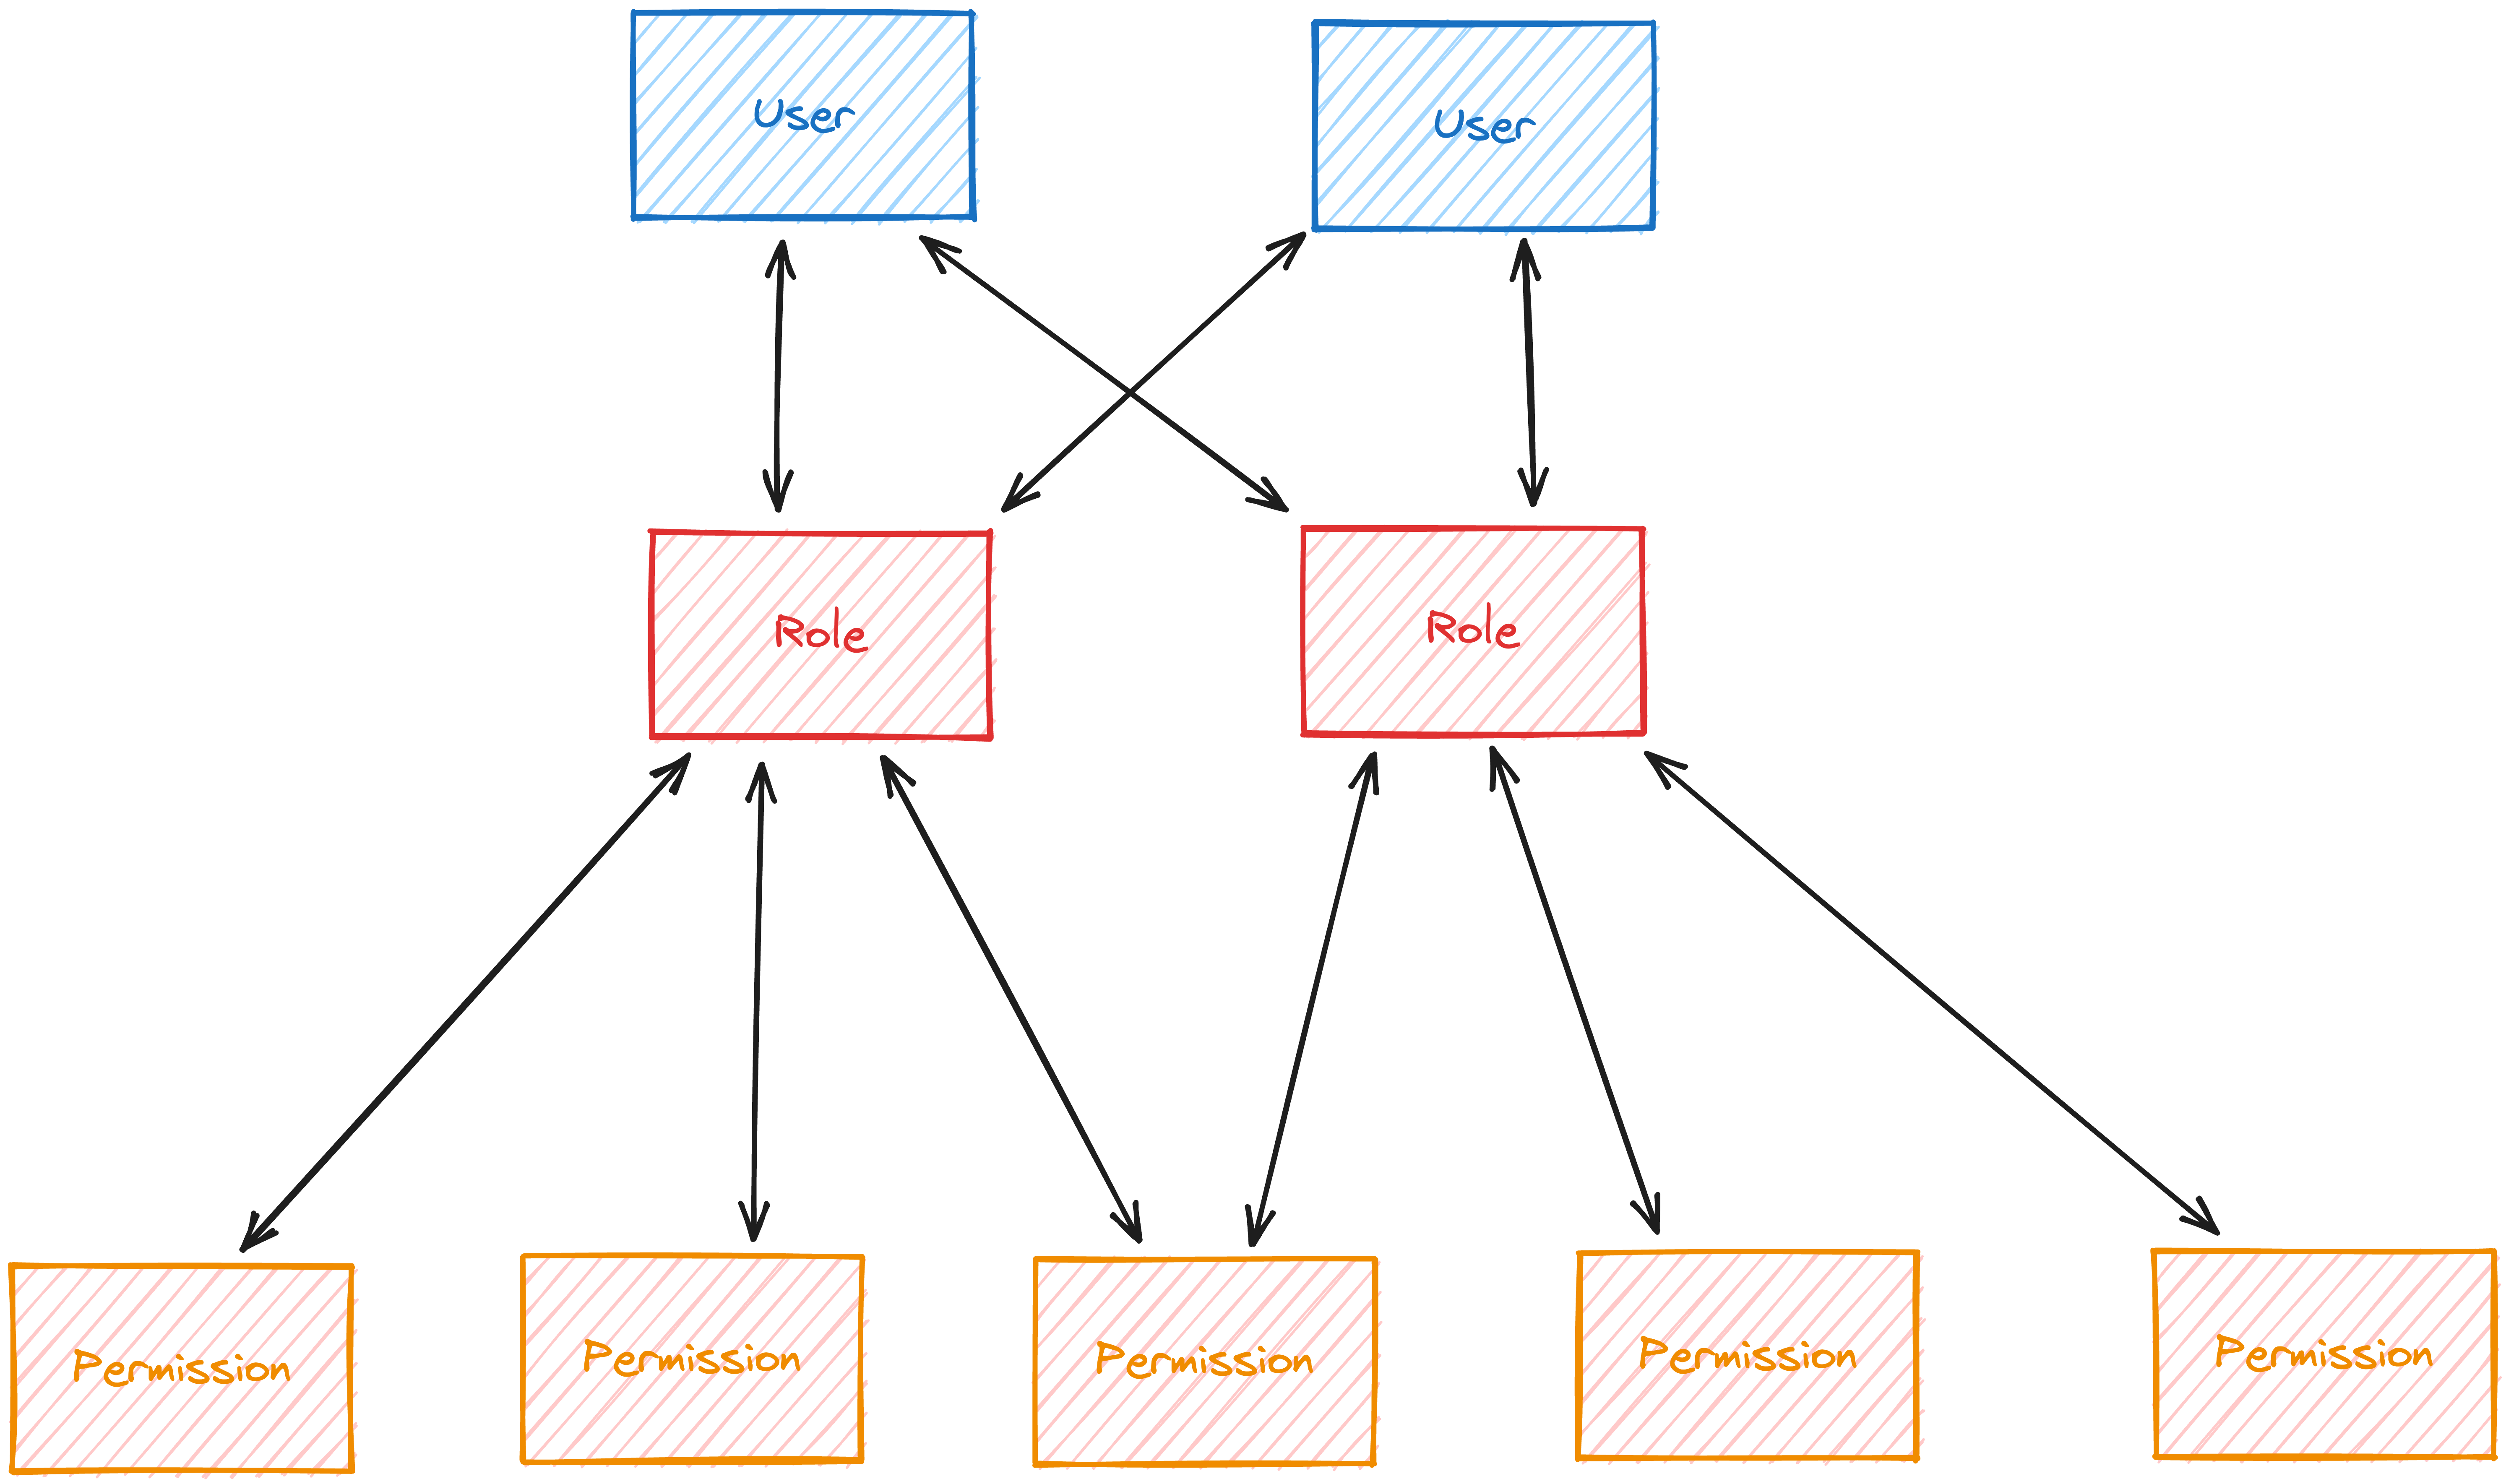
- RBAC is used commonly by medium to large organisations that need to categorise their personnel using role assignment.
model Permission {
  id          String   @id @default(cuid())
  action      String
  entity      String
  access      String
  descritpion String   @default("")
  createdAt   DateTime @default(now())
  updatedAt   DateTime @updatedAt

  roles Role[]

  @@unique([action, entity, access])
}

model Role {
  id          String   @id @default(cuid())
  name        String
  description String   @default("")
  createdAt   DateTime @default(now())
  updatedAt   DateTime @updatedAt

  permissions Permission[]
  users       User[]
}
Of course, you want to seed the database after that, but you want to make sure that this will apply when you release your migration. You can write SQL by your own, but you can also create a script that will:
- create a database
- apply migration
- create data in it that we want to seed into it
import { PrismaClient } from '@prisma/client'
import { execaCommand } from 'execa'

const datasourceUrl = 'file:./tmp.ignored.db'
console.time('🗄️ Created database...')

await execaCommand('npx prisma migrate deploy', {
	stdio: 'inherit',
	env: { DATABASE_URL: datasourceUrl },
})

console.timeEnd('🗄️ Created database...')

const prisma = new PrismaClient({ datasourceUrl })

console.time('🔑 Created permissions...')
const entities = ['user', 'note']
const actions = ['create', 'read', 'update', 'delete']
const accesses = ['own', 'any']

for (const entity of entities) {
	for (const action of actions) {
		for (const access of accesses) {
			await prisma.permission.create({ data: { entity, action, access } })
		}
	}
}
console.time('🔑 Created permissions...')

console.time('👑 Created roles...')
await prisma.role.create({
	data: {
		name: 'admin',
		permissions: {
			connect: await prisma.permission.findMany({
				select: { id: true },
				where: { access: 'any' },
			}),
		},
	},
})

await prisma.role.create({
	data: {
		name: 'user',
		permissions: {
			connect: await prisma.permission.findMany({
				select: { id: true },
				where: { access: 'own' },
			}),
		},
	},
})
console.timeEnd('👑 Created roles...')

console.log('✅ all done')
Next, run a script to dump sql from a database into an SQL file. In sqlite3 example, you can do it like below
sqlite3 ./prisma/tmp.ignored.db .dump > tmp.ignored.sql
Once that’s done, you can copy all INSERT statements from it and paste it into your migration file.
Also, you have to update your seed file to connect created users with roles.
Once done, you can reset the database using the following script
npx prisma migrate reset --force
Managed Sessions
Managed session is a way of controlling auth sessions that allows remote removal of a session. The session is stored in a database and has an expiration time, id and user Id. When the user logs in, we create a session record in the database with the user Id instead of setting the id in the cookie. When the user makes a request, you can find the user attached to the session.
With the above, you can display a page with a list of all active sessions and be able to delete all of them if someone will forget to log out and will want to delete the session remotely.
Also, make sure that you filter out expired sessions, but you can set up a cron job that will do it for you.
model Session {
  id             String   @id @default(cuid())
  expirationDate DateTime

  createdAt DateTime @default(now())
  updatedAt DateTime @updatedAt

  user   User   @relation(fields: [userId], references: [id], onDelete: Cascade, onUpdate: Cascade)
  userId String

  // non-unique foreign key
  @@index([userId])
}
Sessions and Sign up
When signing someone up, you have to create a session at the same time while you are creating a user
Sessions and Sign In
When signing in, you have to check whether or not the user exists, then create a session with the user’s Id and return that session id
Sessions and Logout
While logging out, you want to delete all session with the user id and not the current session
Sending emails is a bit tricky, because of all the spam protection. For that reason, it is always better to use some 3rd party service like resend. For sending emails, you have to use SMTP. For that, you can use nodemailer. Issue with using SMTP is that it’s not easy to mock it for local dev. For creating HTML, you can use react.email.
How to setup test email service
- Create a fake function that will be sending emails to the service. In our case, it is
https://api.resend.com/emails.
import { getErrorMessage } from './misc.tsx'

export async function sendEmail(options: {
	to: string
	subject: string
	html?: string
	text: string
}) {
	const from = 'hello@epicstack.dev'

	const email = {
		from,
		...options,
	}

	const response = await fetch('https://api.resend.com/emails', {
		method: 'POST',
		body: JSON.stringify(email),
		headers: {
			Authorization: `Bearer ${process.env.RESEND_API_KEY}`,
			'content-type': 'application/json',
		},
	})
	const data = await response.json()

	if (response.ok) {
		return { status: 'success' } as const
	} else {
		return {
			status: 'error',
			error: getErrorMessage(data),
		} as const
	}
} - Create a mock server using
mswthat will intercept the request. It should only run if there’s aMOCKenv var set totrue.
import closeWithGrace from 'close-with-grace'
import { passthrough, http } from 'msw'
import { setupServer } from 'msw/node'
import { handlers as resendHandlers } from './resend.ts'
// 🐨 you're gonna want these
// import { setupServer } from 'msw/node'
// import { handlers as resendHandlers } from './resend.ts'

// eslint-disable-next-line @typescript-eslint/no-unused-vars
const miscHandlers = [
	process.env.REMIX_DEV_ORIGIN
		? http.post(`${process.env.REMIX_DEV_ORIGIN}ping`, passthrough)
		: null,
].filter(Boolean)

const server = setupServer(...miscHandlers, ...resendHandlers)

server.listen()

// 🐨 call setupServer with the handlers here
// 💰 make sure to include both the miscHandlers and the resendHandlers

// 🐨 call server.listen with an onUnhandledRequest of 'warn'
console.info('🔶 Mock server installed')

closeWithGrace(() => {
	server.close()
	// 🐨 call server.close here
})

// Root of your application
if (process.env.MOCKS) {
	await import('./tests/mocks/index.ts')
} - Create a handler, that will take the value from a request, will return a response, and will intercept the url of the service.
import { faker } from '@faker-js/faker'
import { HttpResponse, http, type HttpHandler } from 'msw'
import { z } from 'zod'

const EmailSchema = z.object({
	to: z.string().email(),
	subject: z.string(),
	html: z.string().optional(),
	text: z.string(),
	from: z.string(),
})

export const handlers: Array<HttpHandler> = [
	http.post(
		'https://api.resend.com/emails',
		async ({ request, params, cookies }) => {
			const body = EmailSchema.parse(await request.json())

			return HttpResponse.json({
				id: faker.string.uuid(),
				created_at: new Date().toISOString(),
				...body,
			})
		},
	),
]
Passing short lived data between routes
Passing data is sometimes useful, but you have to make sure it is consistent You can use session cookie for it and set it for, for example, 10 minutes.
Use cases
- You can use it for sign up process to store information whether or not this particular user has a session cookie and if it does, you can redirect to a further state of the application.
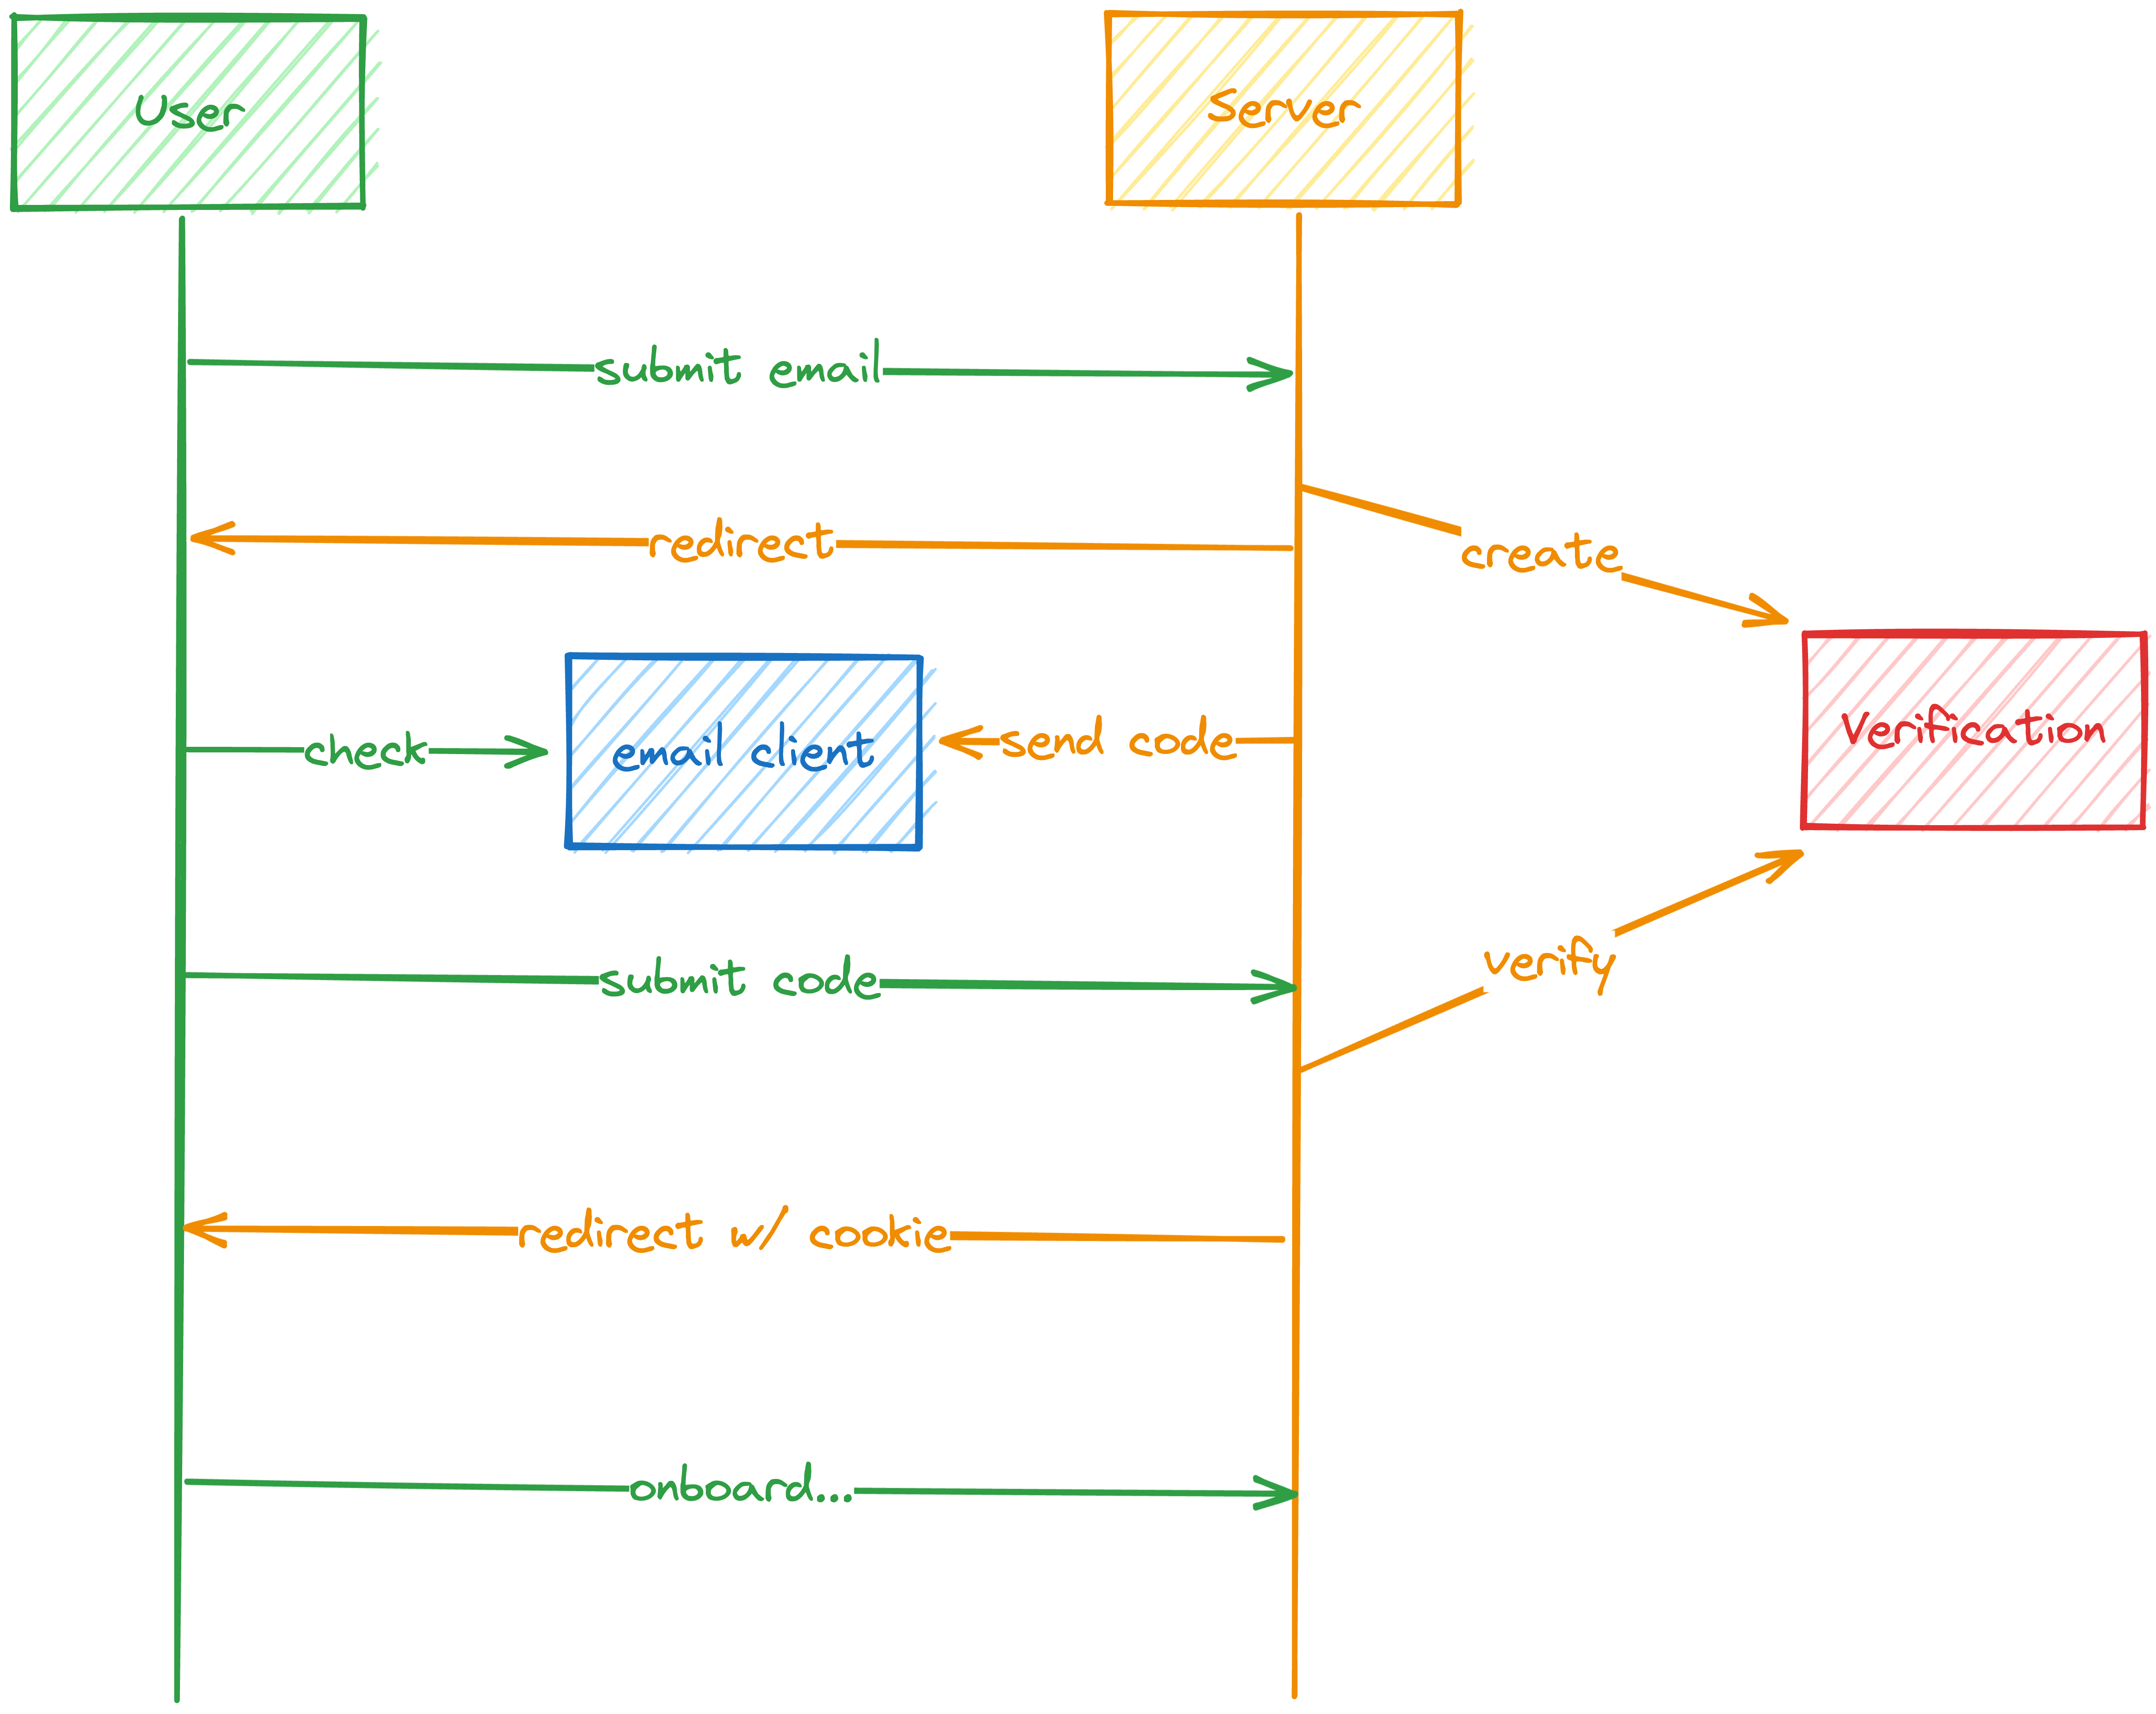
Verification
Verification is great for making sure the user’s contact details are correct. You can prevent people from using not their email and trying ti impersonate others. It also helps with the reduction of spam accounts made on the website. Also, it can help to reduce the number of types that users can make when entering contact information.
Verification codes
There are a few verification approaches, but most involve sending the user a message with a code and asking them to enter that code in the app. It can be a short code but you have to remember that the shorter the code, the easier it is to brute-force attach. For that reason, you have to use rate limiting o limit the number of requests the person can make.
HMAC-based OTP
HOTP algorithm is a great way to generate one-time passwords.
- They are short lived
- Short
- can be used for sign up as well as w for 2FA.
The most important part is that the verification must be done with the same settings that were used to generate the code. Because of that, all of it needs to be saved in a database and then retrieved when verifying that code.
model Verification {
  id        String    @id @default(cuid())
  createdAt DateTime  @default(now())
  type      String // e.g. email or phone
  target    String // e.g. email or phone number
  secret    String
  algorithm String
  digits    Int
  period    Int
  charSet   String
  expiresAt DateTime?
}
!! Read about X-Forwarded-Host header
How to add minute to a date
const curentUTC = new Date().getTime()
const in20Min = new Date(currentUTC + (1000*60*20))
How to do where when two values must be made unique
const d = await prisma.verification.upsert({
		where: { target_type: { target: email, type: 'onboarding' } },
		update: {
			type: 'onboarding',
			target: email,
		},
		create: {
			type: 'onboarding',
			target: email,
			expiresAt: new Date(new Date().getTime() + 1000 * totp.period),
			digits: totp.digits,
			charSet: totp.charSet,
			algorithm: totp.algorithm,
			period: totp.period,
			secret: totp.secret,
		},
	})
Reset Password
Every app needs a page to reset password. It should take an email, then generate a verification for the password reset, send the OTP and once they submit, we can verify the ownership of that account and allow them to reset the password.
Reset password flow
Login → Reset Password → Verify → Change the password → Login
You can use cookie sessions for storing the session
Email change
Changing email is something that you probably want to allow users to do. You also have to do it in a secure way. You don’t want to allow users to change their email just like that without verification, because they can easily make a typo and lock themselves out.
You also want to verify the new one before you complete the change, and also verify the old one to avoid someone changing their email without their knowledge. If someone hasn’t made a change, they can contact support to revert that change.
Another approach is to allow multiple emails per user, and make one as a primary/default.
2 FA
2FA is a way to add extra layer of security for users and their accounts. It requires entering a code from another device in addition to a password and username.
The attacker won’t be able to access the account, unless they have an access to user’s phone.
Implementation is similar to other verifications, but there are some differences:
- Verification won’t have an expiration
- The period will be much shorter (30s)
- The code will be generated by the 2FA app on user’s device instead of it being sent via email
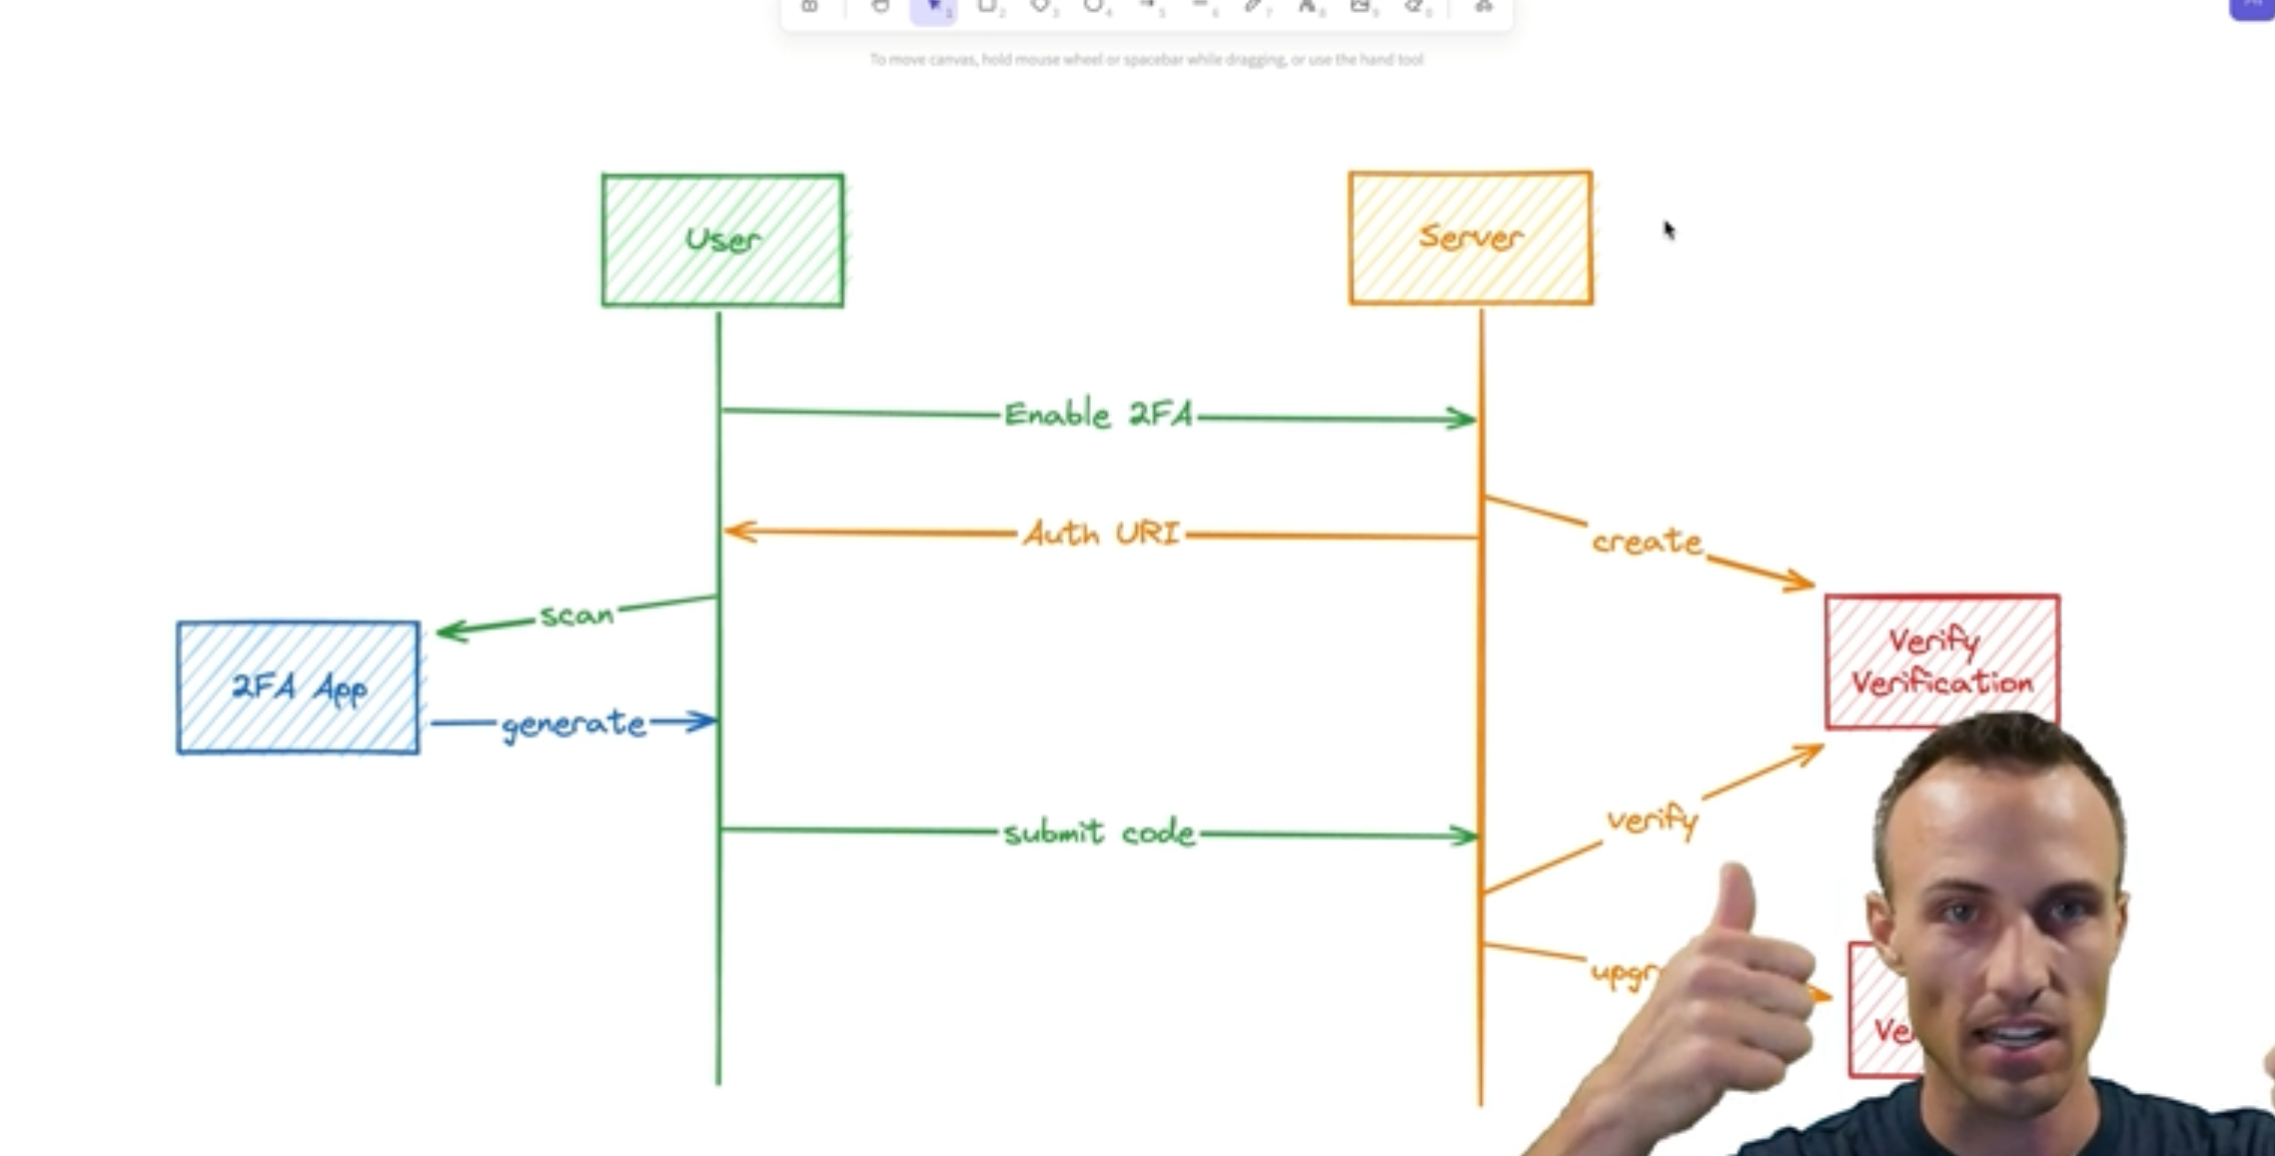
Enabling 2FA
To enable 2FA, you need to create a varification with a type 2fa-verify. Upon clicking on the 2FA button, a request will be sent that will generate a TOTP and send the verification configuration in a database. expiresAt should be included to check if the user takes too long to verify and we can delete it safely and ask the user to go through the process once again.
It is important to note that 2FA only accepts SHA1 and charSet 1234567890, so make sure these are the defaults on your end.
Verify page
- Check if the verification exists in a database and it is not expired.
- check if the user with the id exists
- if they do, create TOTPauthURI and QRCode
- to generate QR code, you can use qrcode library.
- return both to the user.
Verify the code
- Check if the verification exists and verify TOTP
- If it does not exists, you must inform the user about it
- If it does, you have to update the record in a database and change the expiry date to null (infinitiy) and the target
Verify 2FA code
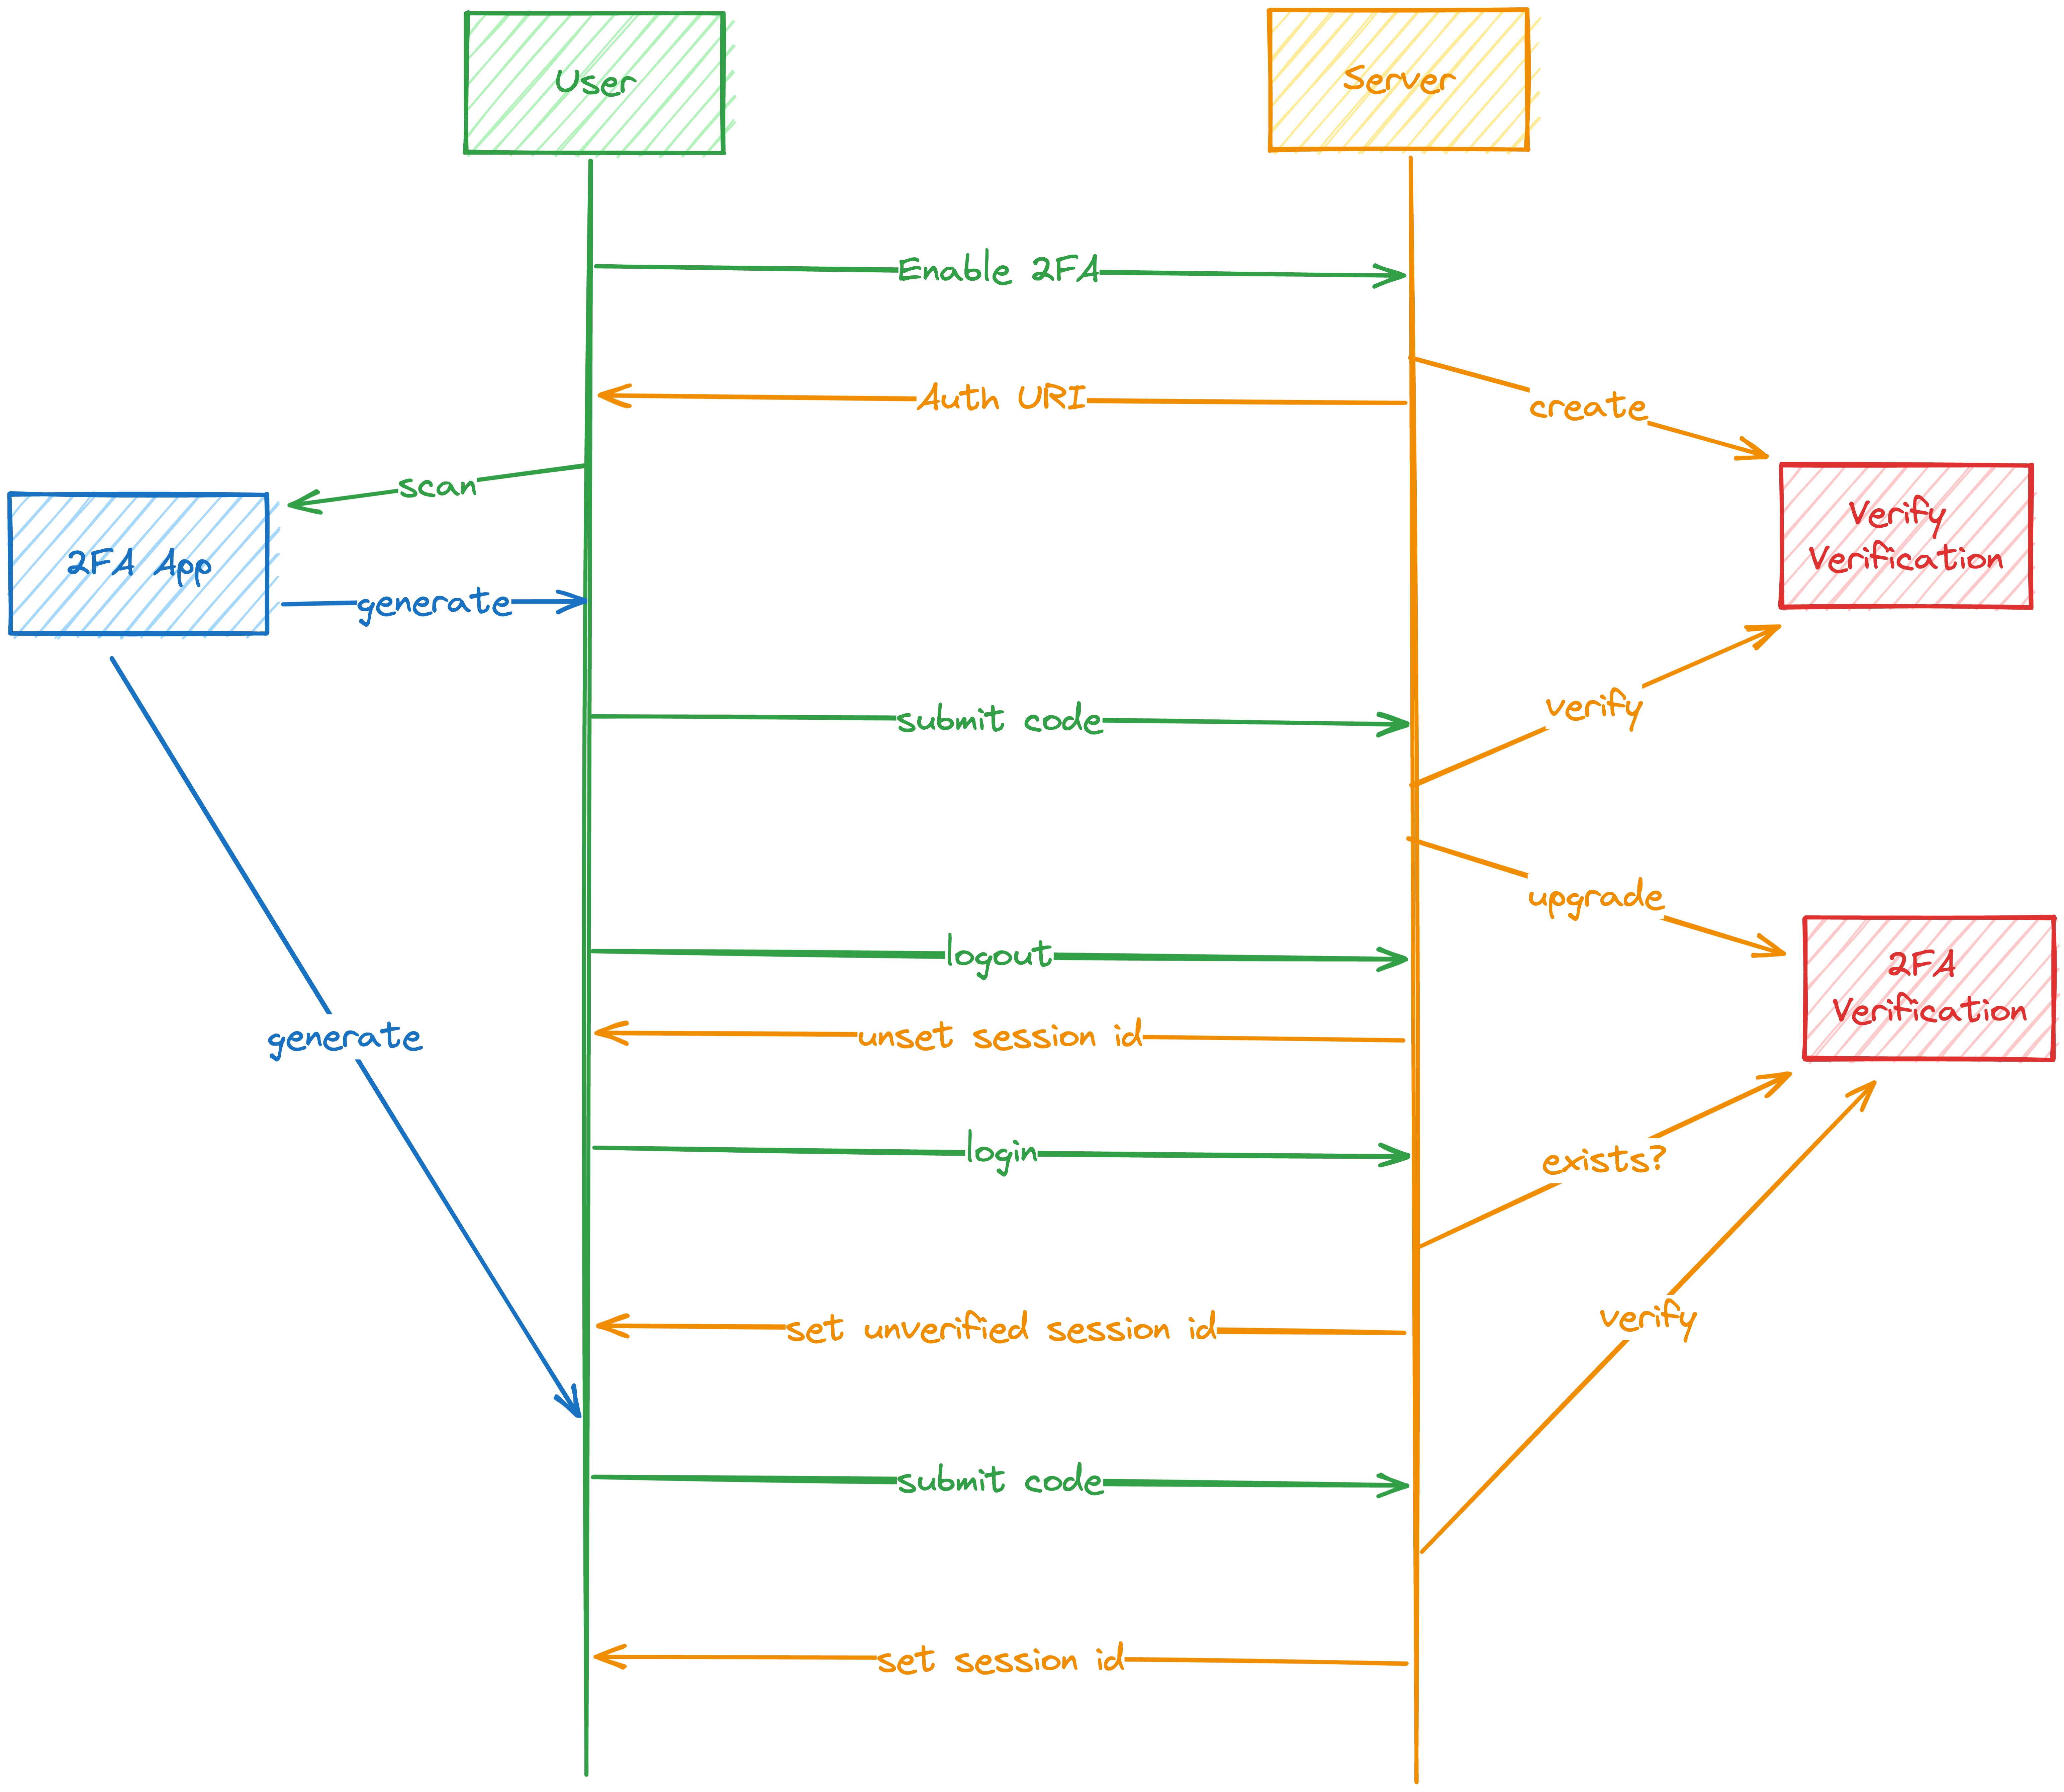
- The user logs out (eventually)
- The server unsets the session ID (we do all this already)
- The user logs back in
- The server checks that the 2FA verification exists
- The server still create their managed session, but instead of the main
cookieSession, we put it in theverifySessionand send them to the/verifyroute. - The user submits the 2FA code generated by their app
- The server verifies the code
- The server moves their session from the
verifySessionto the regularcookieSession.
Disable 2FA
- 2FA should not only be used for logging in, but also for making changes that are sensitive (for example changing email or password)
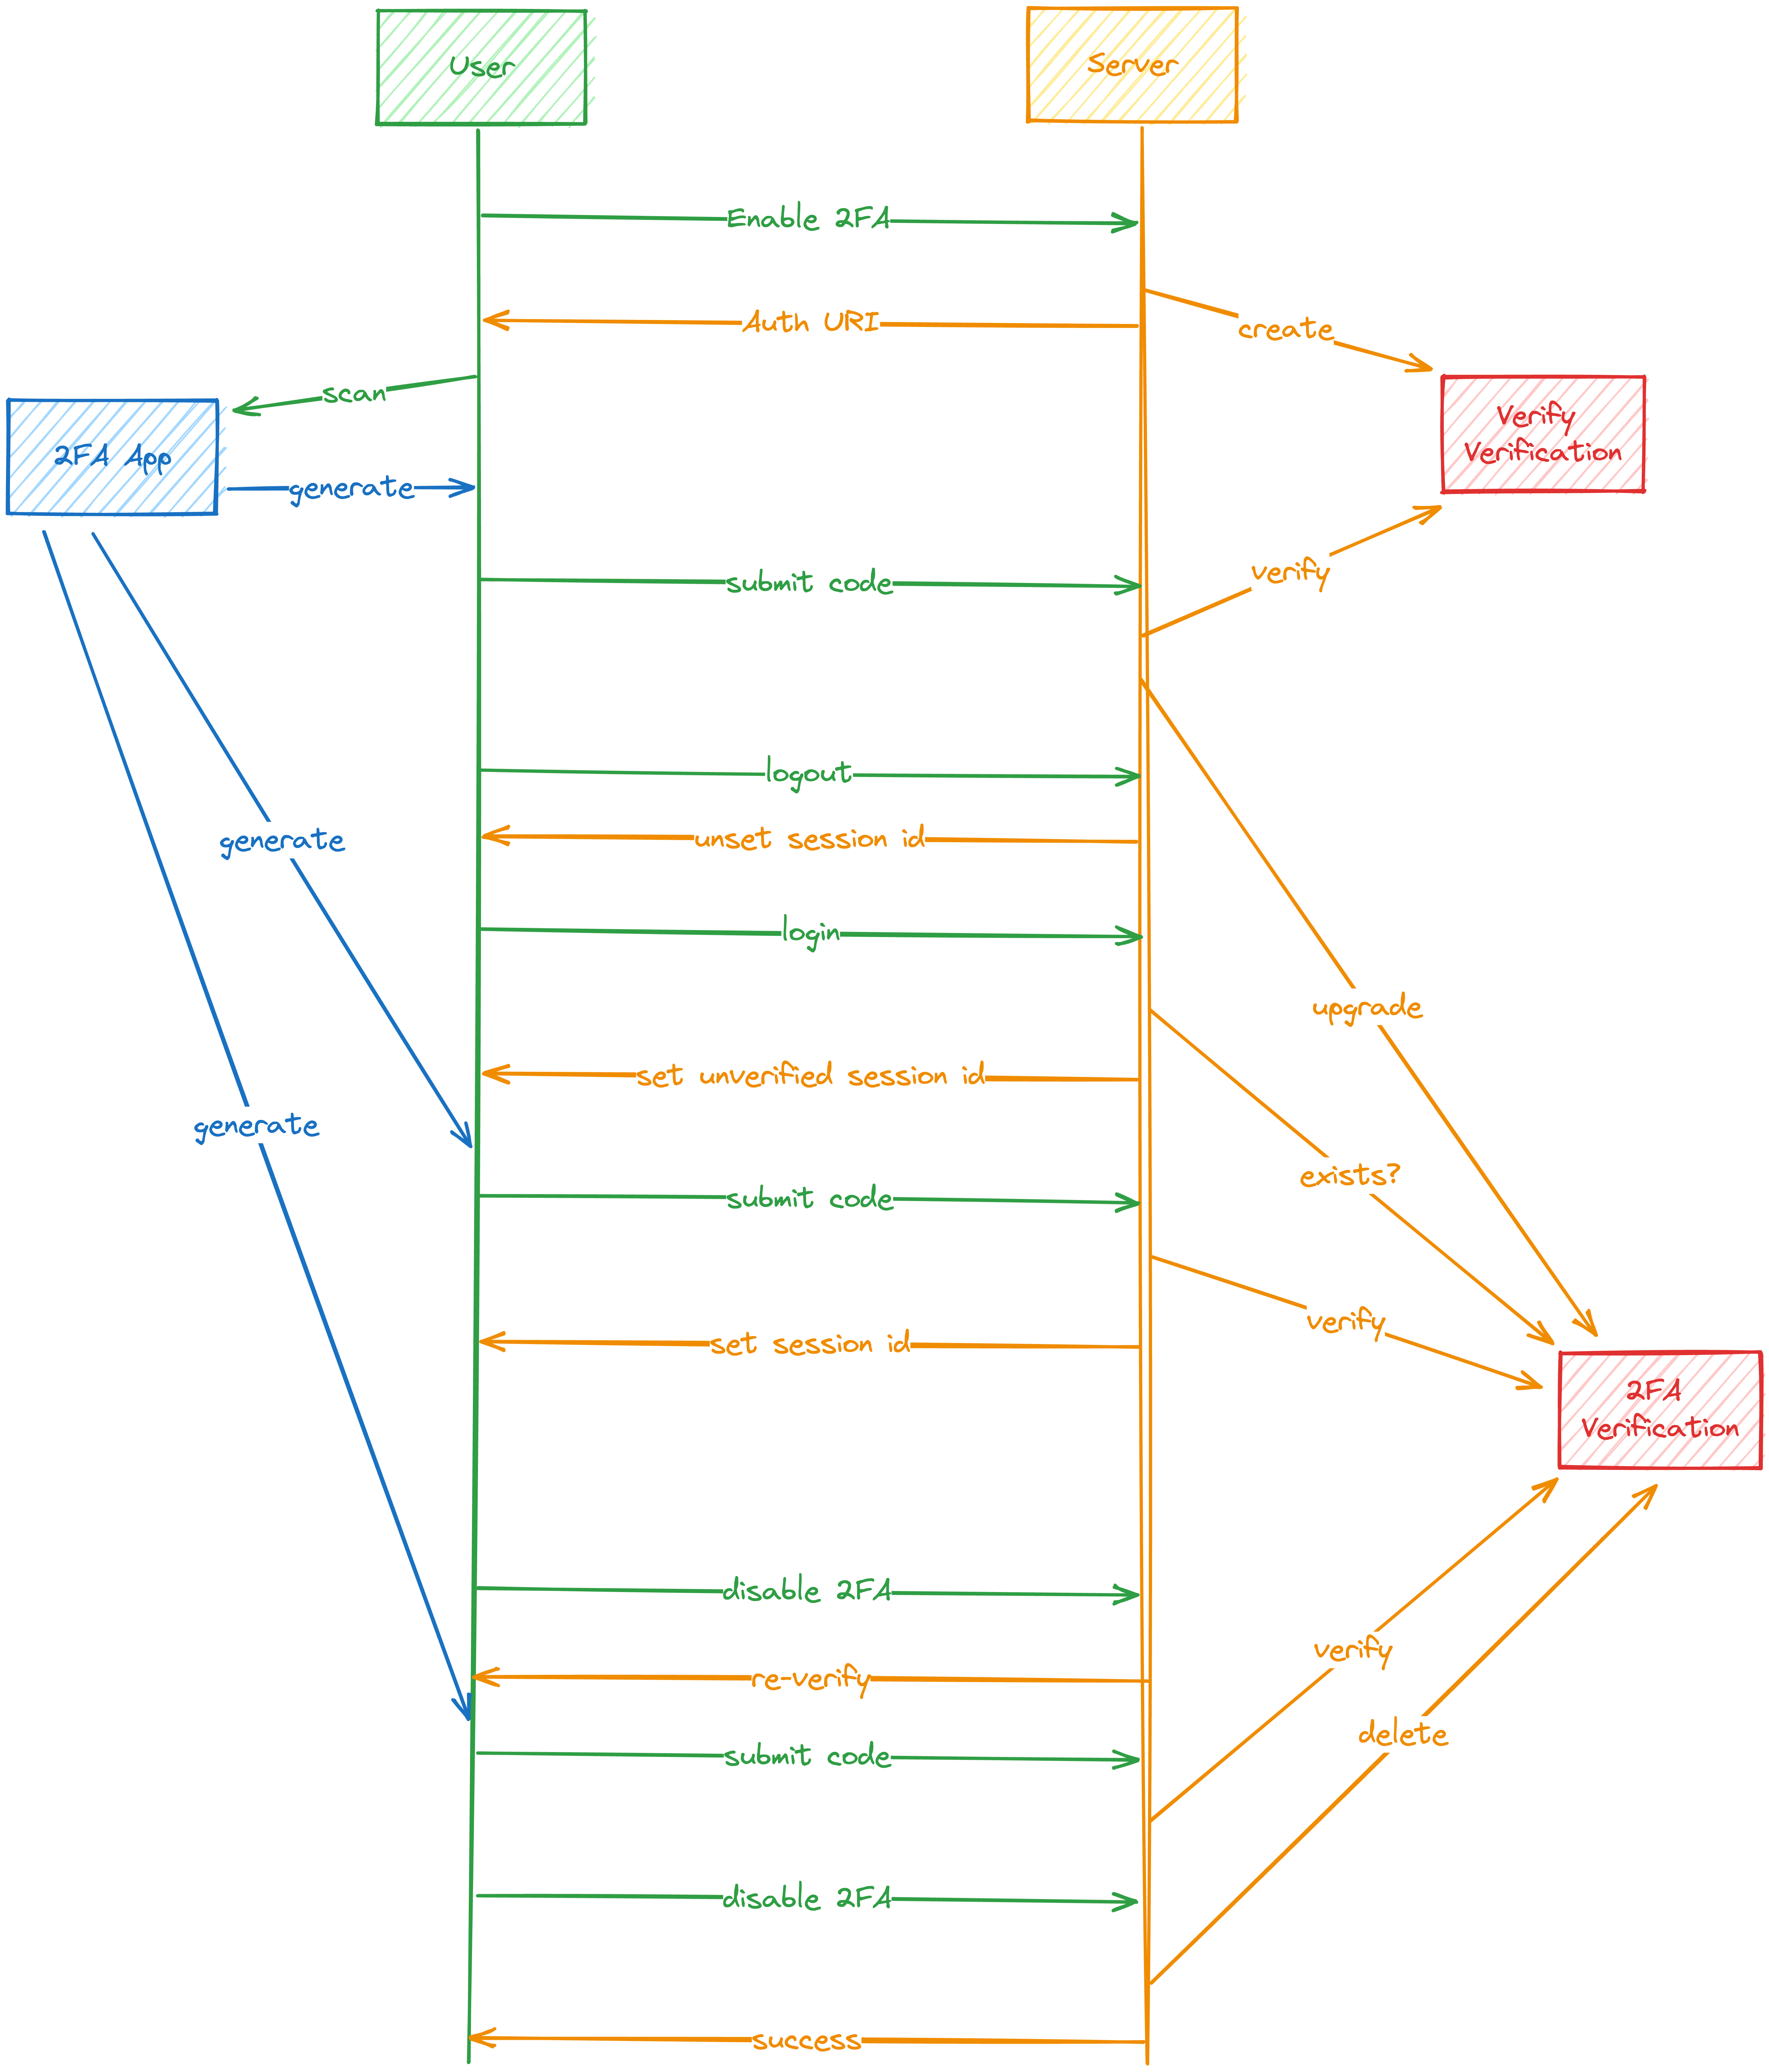
- Also, we do not want to require this from a user every time they want to make that change and we need to store information about when they submitted it last time.
Should Reverify
To re-verify the 2FA, we need to keep track of when the user last submitted his/hers 2FA code. for this purpose, you can use session cookie and check on login. You also need to create a utility that will check whether 2FA should be requested or not by checking whether user has 2FA active, they have unverifiedSessionId and if it does, should return true. If there’s verified time in a cookie, we need to check whether it has expired or not.
Then everywhere we need to re-verify, we have to check and redirect to verify route.
- You can override the original implementation of built in methods using
Object.defineProperty
const originalConsoleLog = console.log

Object.defineProperty(console, 'log', {
	value: (...args) => {
		originalConsoleLog('👋', ...args)
	},
})
OAuth
OAuth is a authentication standard that lets you use 3rd party authentication providers to authenticate your users.
OAuth flow
- User clicks on
login with provider - The server redirects to the provider and sets the cookie to keep track of the user so we remember them when they come back
- The user authenticates with the provider
- The provider redirects the users which triggers a request to a server with a code and some additional information that helps to associate the user with the cookie
- Server exchanges the code for an access token and uses that to get user’s profile
- Server gest/creates a connection in a database for the user if they already exist
- If they do not exist, then redirects to onboarding with a value in verifysession that verifies the user owns the email address which they authenticated on the provider with.
Single Sign On (SSO)
Single Sign On is quite often required in b2b or SaaS applications where the customer requires using their identity provider to authenticate users.